0%

前言

最近總算花了 999 鎂 (但卻是 3400 台幣!?)註冊了開發者帳戶
總算可以打包 expo dev client 到 iPhone 上了

所以前幾天註冊了我自己的 iPhoneX 到 JapanGo 上
並下載 dev client 測試,沒什麼問題
那我就想,應該把 Josie 的 iPhone SE 也拿來測試一下
畢竟那是最小的 iPhone
那因為我要多註冊一個裝置,所以必須重新打包
這時 EAS 就報錯了

題外話:等好久…

不知道是不是因為凌晨是國外的 APP 打包旺季
EAS build 居然需要排隊 270 分鐘!!!
阿不就幸好我可以去睡覺 (其實也早該睡了)
不然也等太久了吧
算了反正我是 EAS 免費仔
不付費就是要排隊XD

回來正題:EAS 報錯

總之我睡了一覺起來就看到紅色的 error
錯誤訊息如下:

1
2
3
4
Error: Compatible versions of some pods could not be resolved.
You are seeing this error because either:
- Versions in the Podfile.lock cached by EAS do not match required values in Podspecs of some of the libraries. To fix that add the "cache.key" field (it can be set to any value) in the build profile in eas.json to invalidate the cache.
- Some of the pods used in your project depend on different versions of the same pod. See logs for more information.

看起來是 cache 出問題,訊息中也提到說要忽略 cache
因此方法很單純,只要再重新eas build
並記得加上 --clear-cache 的 flag
把 cache 清掉就好了

參考資料

結論

如果需要重新打包 APP 的話,建議都加上 --clear-cache flag
尤其是當你有更改打包的設定時

前言

當完兵後把 JapanGo 從 Expo SDK 42 升級到 46
(因為 42 已經不能用了)
跨度這麼大的升級必然會導致一些套件不能用
例如 expo-app-loadingexpo-ads-admob
前者只要改成使用 expo-splash-screen 就可以了
但處理後者花了我不少時間

根據 Expo SDK 45 Doc
expo-ads-admob在 SDK 46 之後就不能用了
建議改用react-native-google-mobile-ads

react-native-google-mobile-ads 基本用法

首先安裝

1
npm install react-native-google-mobile-ads

google admob 取得 Android 和 iOS 的 app id (如果還沒有的話)

接著一樣在 google admob 中取得 ad id
或者也可以從 這裡 取得測試id

下一步,編輯app.json
這邊需要注意插入以下程式碼的位置,
react-native-google-mobile-ads 的相關設定必須在 expo 之外

1
2
3
4
5
6
7
8
9
{
"expo": {
...
},
"react-native-google-mobile-ads": {
"android_app_id": "ca-app-pub-xxxxxxxxxxxxxxxx~xxxxxxxxxx",
"ios_app_id": "ca-app-pub-xxxxxxxxxxxxxxxx~xxxxxxxxxx"
}
}

再來打開你要放廣告的元件
這邊我也 test id 為例

1
2
3
4
5
6
7
8
import { BannerAd, BannerAdSize, TestIds } from 'react-native-google-mobile-ads';

...

<BannerAd
size={BannerAdSize.BANNER}
unitId={TestIds.BANNER}
/>

最後一步,由於這個元件需要動用原生 API
代表我們不能夠用 Expo Go 來預覽開發了
而是要改用 expo dev client
這篇我就不深入探討這是什麼
可以先當作我們要客製一個可以動用原生元件的 Expo Go 來用

結果這邊就出錯了

無法 build…

執行 eas build --profile development

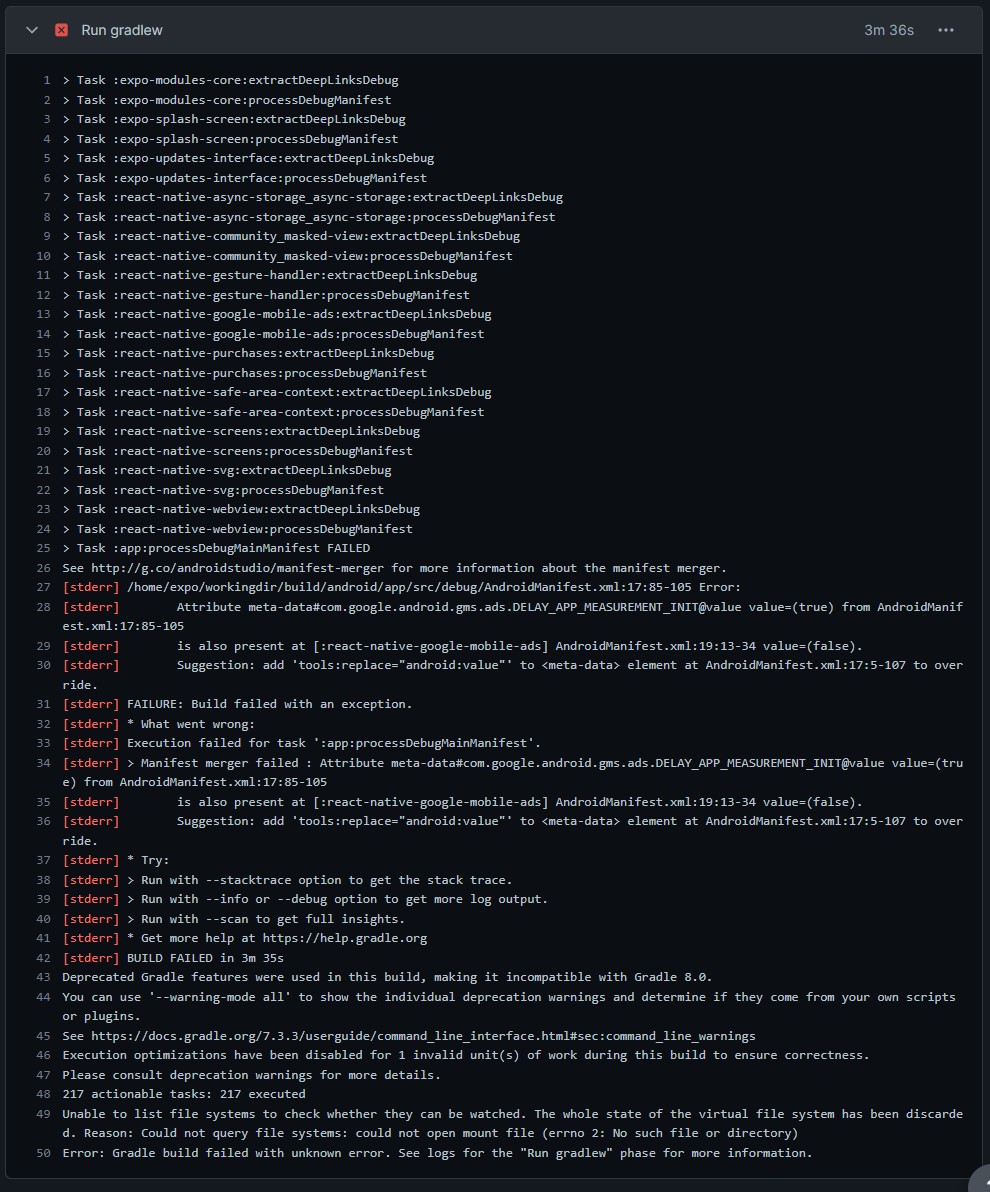
重點應該在第 27 行(重新排版了一下)

1
2
3
4
5
6
7
/home/expo/workingdir/build/android/app/src/debug/AndroidManifest.xml:17:85-105 Error:
Attribute meta-data#com.google.android.gms.ads.DELAY_APP_MEASUREMENT_INIT@value value=(true)
from AndroidMenifest.xml:17:85-105 is also present at [:react-native-google-mobile-ads]
AndroidManifest.xml:19:13-34 value=(false).

Suggestion: add 'tools:replace="android:value"' to <meta-data> element
at AndroidManifest.xml:17:5-107 to override.

雖然不太清楚意思
但大概可以猜到問題出在Android.Menifest.xml裡的
DELAY_APP_MEASUREMENT_INIT這個值
前者是 true 後者是 false

於是我爬了一些資料:

how do I use react-native-google-mobile-ads with expo and expo go

[Medium] migrate expo-ads-admob to react-native-google-mobile-ads

[github issue] migrate expo-ads-admob to react-native-google-mobile-ads

Add installation guide for Expo users

關鍵是最後一篇
這個留言提到一個可能的解法是進到 android 資料夾更改 AndroidMenifest.xml
但那需要 eject,先盡可能避免這個做法
不過我往下看發現作者有提供在app.json設定menifest的方法:

1
2
3
4
5
6
"react-native-google-mobile-ads": { 
"android_app_id": "ca-app-pub-3940256099942544~3347511713",
"ios_app_id": "ca-app-pub-3940256099942544~1458002511",
"delay_app_measurement_init": false,
"user_tracking_usage_description": "This identifier will be used to deliver personalized ads to you."
}

接著我在進一步去翻套件的檔案
european-user-consent.mdx裡看到這段說明

1
2
3
4
5
6
7
8
9
10
11
12
13
14
15
16
### Delaying app measurement

By default, the Google Mobile Ads SDK initializes app measurement and begins sending user-level event data to Google immediately when the app starts.
If your app will be used by users within the EEA, it is important you prevent app measurement until your first ad has been requested (after consent).

Within your projects `app.json` file, set the `delay_app_measurement_init` to `true` to delay app measurement:

``json
{
"react-native-google-mobile-ads": {
"android_app_id": "ca-app-pub-xxxxxxxx~xxxxxxxx",
"ios_app_id": "ca-app-pub-xxxxxxxx~xxxxxxxx",
"delay_app_measurement_init": true
}
}
``

這時我就想
既然 error message 說套件的 DELAY_APP_MEASUREMENT_INIT 和 Expo 裡的不合
那就設為 true 吧
然後就成功了!!!!!!!!! 可喜可賀

結論

其實還有很多環節不懂
例如這個 delay app measurement init 是什麼意思
或者說任何跟原生 code 有關的東西我都不知道是什麼意思…
總覺得還有好長一段路要走

但這次的 debug 經驗還不錯
有從 error message 判斷出一些可能的方向
然後看了很多討論串
也實際去翻套件的程式碼
雖然不是完全懂了才解決問題
但也不至於誤打誤撞 不清楚自己做了什麼

總之 APP 的廣告功能又回來啦!

前言

在學習生成動態頁面(dynamic routes)時
看到了兩種方法: getStaticPathsuseRouter
來整理一下他們之間的差異

在 server side 生成動態頁面 getStaticPaths

getStaticPaths 和 getStaticProps 一樣
是只會跑在 build time 的函式
假如我們的頁面數量是根據某個資料決定的
那是不是我們只要在 build time 之前
手中握有那份資料,然後告訴 Next 怎麼依照資料產生頁面
這樣就不用手刻好幾十個頁面檔案
這時就要用到getStaticPaths

1
2
3
4
5
6
7
8
9
10
11
12
13
14
15
16
17
18
19
20
21
// in '/pages/[id].js'
export const getStaticPaths = async()=>{
const res = await fetch('https://some-api')
const data = await res.json()

const paths = data.map(item=>{
return{
params:{id:item.id.toString()}
}
})

return {
paths,
//paths 必須是一個 array 包含數個 object,
//每個 object 都長這樣: {params: {id:'xxx'}} <--- 註: key 是 id 因為檔名是[id].js
//這些 object 會作為 prop 分別傳進 getStaticProps 中

fallback: false
//當 fallback 為 false 時,如果用戶進到不存在的 route 時,預設會顯示Next.js
}
}
1
2
3
4
5
6
7
8
9
10
11
// in 'pages/[id].js'
export const getStaticProps = async({params}) => {
const res = await fetch(`https://some-api/${params.id}`)
const data = await res.json()

return {
props:{ //這個 props 會傳進 page component 中
data
}
}
}

以上動作會在 build time 的時候進行一次

在 client side 產生動態資料 useRouter

另一種情境是
可能我們的網站有連接資料庫,而那個資料庫時常更新
每當資料庫多出現一個 record 時(例如新增一篇貼文)
前端可能也需要多一個頁面來呈現它
但如果因此就需要重新 build 一次的話就太麻煩了
這時就可以用useRouter來達到動態頁面
簡單來說,頁面都是同一個
只是會根據 URL 來取得動態資料

1
2
3
4
5
6
7
8
9
10
11
12
13
14
15
16
// in '/pages/[id].js'
import {useRouter} from 'next/router'

export default function Page(){
const router = useRouter()
const {id} = router.query
// 由於檔名中有 [id]
// 所以實際 URL 中,'/pages/'之後的字串就會被當作 id params
// 可藉由 useRouter().query 取得其值

return (
<div>
<p>{id}</p>
</div>
)
}

以上動作會在 client side 的每次 request time 運行一次

結語

getStaticPaths 是在 build time 根據你定義的方法動態生成頁面

useRouter 是在 request time 根據瀏覽器的 URL 動態生成參數